Publishing with Dreamweaver CS4
By B Lingafelter FTP, Dreamweaver
Once your Web site has been tested and validated, it's time to move the whole site to a Web server where it can be viewed by anyone in the world. This process involves three major steps:
- Select a web host and setup an account. There are many companies that provide good reliable and relatively inexpensive web hosting. However, in this class you will use your free Butlercc Webhosting student account at http://butlerccwebdev.net/.
- Define the FTP connection for a remote web server in Dreamweaver. Generally, this just means adding your server and respective FTP details to the Servers category of an existing site definition.
- Transfer your Web site files to the remote server using Dreamweaver's built in FTP tools.
Define the FTP Connection for a Remote Web Server
- This tutorial assumes you have already setup a site for your DW Projects folder. If you haven't, please go back and do it before you go on.
- To edit your DW Projects site definition, choose Site > Manage Sites. Select your DW Projects site and click Edit.
- If necessary, click the Advanced tab.
- Click Remote Info in the Category panel.

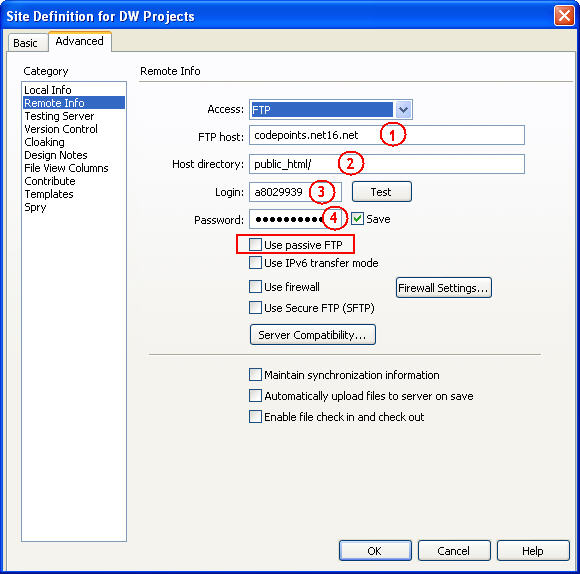
- From the Access drop-down, choose FTP.
- In the FTP host field, type yoursubdomain.butlerccwebdev.net - Generally this may be something like www.mydomain.com or subdomain.mydomain.com but should never include directories, folders, slashes, ftp://, or http://.
- In the Host directory field, type public_html/ . This is the path to the root directory of your Butlercc Webhosting account, which is where you will place the contents of your site's root folder. The location and name of your root directory is determined by the Web host. Other common names used also include www and htdocs. In some cases, this field may even be left blank.
- In the Login and Password fields, type your Username (Butlercc Webhosting limits usernames to 8 characters maximum - Refer to the web account information supplied by your instructor) and the password you chose in cPanel.
- Click the Test button to see if Dreamweaver can connect to the Web server. If you can connect, skip to step 14.
- If Dreamweaver is not able to connect, you will get an FTP error message with some additional information. Generally, the error is with one of the four pieces of information you entered - double check spelling, subdomain, username, and of course your password. Note: If you can login to cPanel at http://butlerccwebdev.net/ with your Username and Password, you can be sure that is not the cause of any connection problems.
- Try checking the Use passive FTP checkbox and click Test again. Many routers/firewalls require this before you are allowed to connect to a web server.
- Turn on the "Use firewall" box only if necessary. If your system administrator confirms you have a firewall, you'll need to set the name of the firewall host computer and its port number in the Firewall Settings dialog.
- Do not turn on "Use Secure FTP (SFTP)" as Butlercc Webhosting does not offer this option.
- When you are able to connect successfully, check the Save box so Dreamweaver will remember your password each time you connect to the Web server.
- Turn off the "Maintain synchronization information" box. When turned on, Dreamweaver can move changed files to the Web server.
- Turn off the "Automatically upload files to server on save" box.
- Turn off the "Enable file check in and check out" box, unless you are working with a team. This forces each team member to check out a file when editing and does not allow another member to edit that same file until it's been checked back in.
- Click OK to return to Manage Sites, and then click Done.
Transfer Web site files
- If necessary, select your DW Projects site in the Files panel. Be sure to close any files you want to transfer.
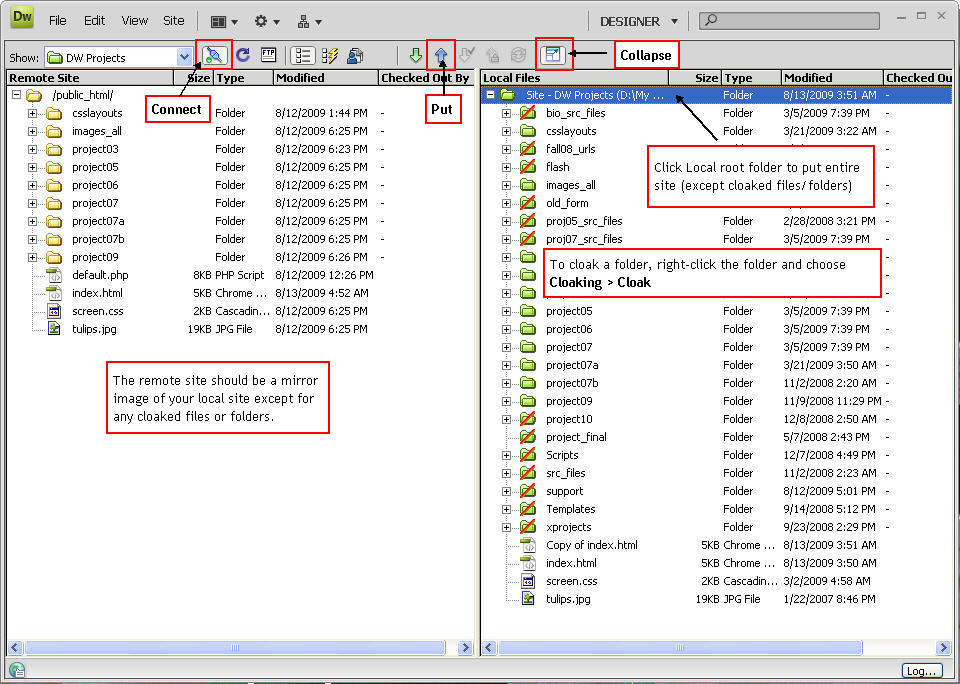
- In the Files panel, click the Expand/Collapse button at the right end of the toolbar (under the View drop-down). This opens the Expanded Files panel, which shows your local site on the right, and the remote Web server files on the left.

- Click the Connect button to connect to the Remote Web server you setup in your site definition.
- Cloak any folders that you do not want to publish. Right-click the folder and choose Cloaking > Cloak.
To hide individual files from the transfer process based on their extensions, like .psd or .fla files, edit the site definition and select the Cloaking category. Turn on the "Cloak files ending with" box and type in the extensions you wish to hide. Each extension must begin with a period, and be sure to separate extensions with a space. - To put the entire site, click the local root folder at the top of the Local site panel on the right.
- Click the Put button (blue up arrow).
- When prompted to transfer dependent files, click Yes. Dependent files are images, css files, flash movies and any other files placed onto a page that are required for the page to display properly.
- When all files have been transferred, click the Disconnect button.
- Click the Collapse button to return to your normal workspace.
- In a browser, go to your domain URL (something like http://yoursubdomain.butlerccwebdev.net/) to view your site.
Now go ahead and broadcast your URL to the world, or at least tell your family and closest friends.