FileZilla Tutorial
By B Lingafelter Updated FTP
FileZilla is a free, open source, cross-platform FTP client that provides easy and intuitive access to FTP servers. Download FileZilla and install the appropriate version for your operating system. Windows users should select the appropriate .exe file for your platform. If you're using a portable drive on a Windows system, download FileZilla Portable and run the .paf.exe file to install to your portable drive.
Note: If you didn't use the download link above, and ended up on the page shown below, please do not click the big green Download Now button. The installer contains bundled programs you do not want and are not required to install. If you choose to proceed with this installer, please read carefully during installation so you can omit installing unnecessary bloatware.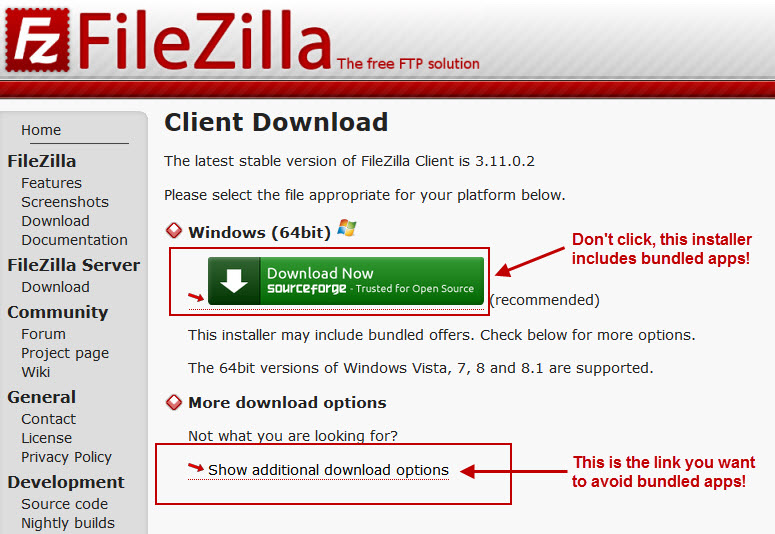
After you have completed the FileZilla installation, you are almost ready to upload files to the server. But first, you will need to know your web account credentials. ButlerCC Web Dev students shoud check the posted Web Account Information for the class and write down the following three pieces of information:
- Subdomain (similar to this: jdoe.butlerccwebdev.net -- most subdomains are your first initial and last name)
- Account username (usernames require the first 8 characters be unique, so yours may differ from your subdomain)
- Account password (this is the password you chose in your cPanel)
While these instructions are provided for Butlercc Webhosting accounts, the process is similar for many other webhosts and can be easily adapted for use with other webhosting accounts. However, you will need to register a domain name and purchase a Web hosting account before you can use FileZilla to upload files.
To setup an FTP connection
You will only need to setup your connection one time. FileZilla retains connection settings until you choose to delete them.
- Open Filezilla and choose File > Site Manager.
- Click New Site button and enter a name for the connection (can be anything that uniquely describes this connection).
- On the General tab, choose the same pull down menu options shown in the screen shot below, and enter your web account credentials. Check the posted Web Account Information for your class and make sure you have written down your subdomain URL, username and password.
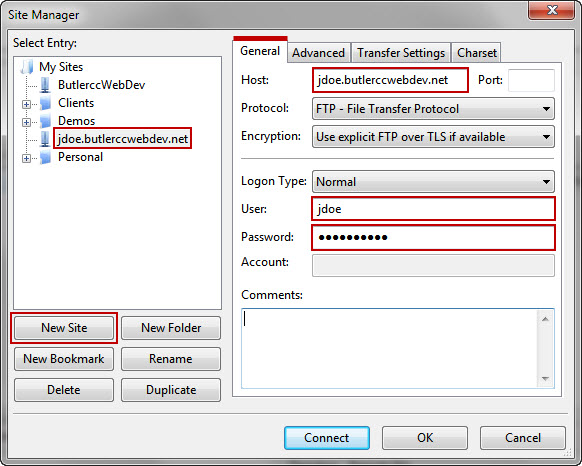
- Host box: Enter yoursubdomain.butlerccwebdev.net (something like jdoe.butlerccwebdev.net -- most subdomains are your first initial and last name).
- User box: Enter your account username (the same one you use to login to your cPanel).
- Password box: Enter your password (the one you previously chose in your cPanel).
- Encryption box: Use explicit FTP over TLS if available - Note: In Butler labs, select Only use plain FTP
- Select the Advanced tab, and enter /public_html in the Default remote directory box.
If you omit this step, FileZilla will connect to the home directory much higher up in the directory structure. This increases the chance that files may be uploaded outside the public_html directory where they will not be accessible to your users.
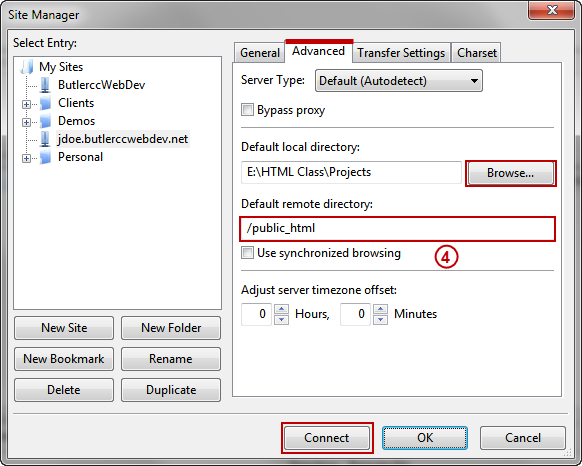
- Save the path to your Projects folder in the Default local directory box. Click Browse and select the Projects folder on your hard drive, portable drive, or cloud storage. If you omit this step, you will have to manually select the Projects folder each time you upload files in the future.
- To save and test your connection, click Connect button. (The OK button saves the connection but does not attempt to connect.)
- If all your account information was entered correctly, Filezilla will now connect to the public_html directory of your account on the remote Web server.
To upload files to your web server
- If already connected to the web server, proceed to step 2. Otherwise, choose File > Site Manager (or click Open the Site Manager button on the toolbar), select your connection and click Connect.
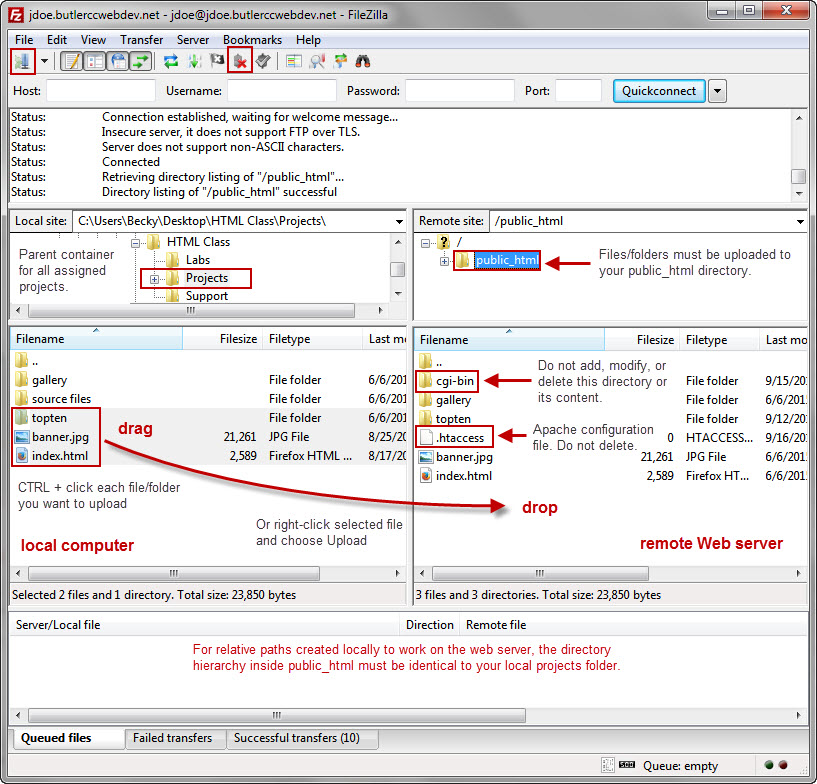
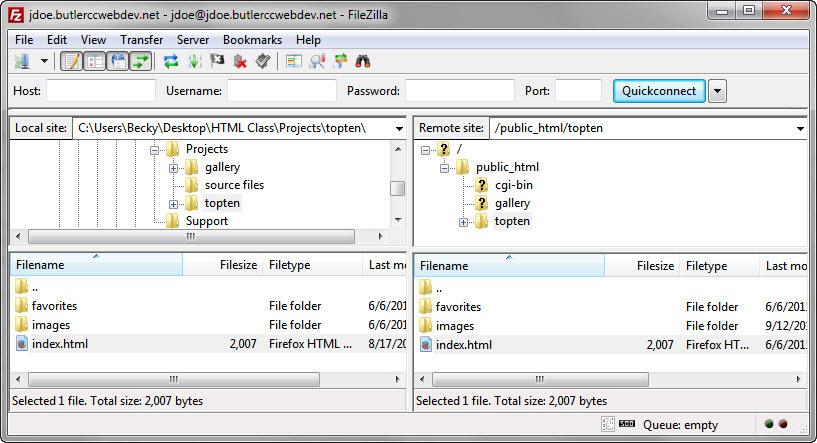
- Notice that FileZilla displays your local computer in the Local site pane on the left, and your web server in the Remote site pane on the right. If you followed the setup instructions, FileZilla should have selected the Projects folder (root folder for this site) on your computer in the Local site pane, and the public_html directory on the web server in the Remote site pane. Any existing files and directories are listed in the boxes below.
- If you omitted steps 4 and 5 earlier, manually select the Projects folder (the root folder for this site) in the Local site pane (left). Then manually select the public_html directory in the Remote site pane (right).
- Locate the cgi-bin directory in the Remote site pane. Do not delete this directory or upload any files to this directory. It contains hidden files you will need later on.
- If you have a .htaccess file in the Remote site pane, do not delete or move this file. It is an Apache configuration file for your server.
- In the Local site pane, select the files you want to upload. If you are setting up your site for the first time, select your index.html (portfolio page). Hint! Press CTRL + click each file/folder you want to upload.
- Drag the selected files/folders to the remote site pane and drop in the public_html directory. Alternatively, you can right-click on a selection and choose Upload from the shortcut menu.
- Wait while Filezilla copies the selected files to the Web server. When the process is finished, you should see the files/directories listed in the public_html folder. Click Disconnect to indicate you are finished.
Open your home page in a browser
- In a browser, enter your subdomain URL in the Address bar (something like
http://jdoe.butlerccwebdev.net/) - The remote Web server should return the index.html file, which should be your portfolio page.
- Bookmark the URL to make it easier to return later.
- Whenever you add new files, test them on your live site. Do this even if they seemed to work on your local machine.
- If you find links that don't work, or have images that are not displayed, open the related files in your editor and make any needed corrections.
- Then upload only the updated files to your web server. When prompted, choose to overwrite the existing files on the server. Note: It is not necessary to upload files again that were not modified. You may need to open a lower directory in both panes to upload a single updated file. (See screen shot below)
That's it--you now have an official web site!