FireFTP Tutorial
By B Lingafelter FTP
 FireFTP is a free, secure, cross-platform FTP client addon for Mozilla Firefox that provides easy and intuitive access to FTP servers. With FireFTP, transferring your files to a Web server is quick and efficient. FireFTP also includes more advanced features such as: directory comparison and synchronization, SSL encryption, search/filtering, integrity checks, remote editing, and much more!
Where to get FireFTP and how to install it
- Open Firefox, browse to Fireftp add-on page and click the Install Now button.
- The first time you install an addon, you may need to click the security Options button at the top of the browser window and choose to Allow the site to install addons. Then, click the Install Now button again.
- In the dialog box, click Install.
- When the addon has been installed, click the Restart Firefox button to finish the installation.
After you have installed the FireFTP add-in, you are almost ready to upload files to the server. But first, you will need to know your web account credentials. ButlerCC Web Dev students shoud check the posted Web Account Information for the class and write down the following three pieces of information:
- Subdomain (similar to this: jdoe.butlerccwebdev.net -- most subdomains are your first initial and last name)
- Account username (usernames require the first 8 characters be unique, so yours may differ from your subdomain)
- Account password (this is the password you chose in your cPanel)
While these instructions are provided for Butlercc Webhosting accounts, the process is similar for many other webhosts and can be easily adapted for use with other webhosting accounts. However, you will need to register a domain name and purchase a Web hosting account before you can use FireFTP to upload files.
To run FireFTP
- Open Firefox.
- From the Firefox Menu bar, choose Tools > Web Developer > FireFTP to open FireFTP in a new tab.
Note: For easier access, add FireFTP icon to existing toolbar. Open the Firefox menu (upper right) and click Customize. Drag FireFTP icon to a toolbar, and Exit Customize.
To setup an FTP connection
You will only need to setup your connection one time. FireFTP retains connection settings until you choose to delete them.
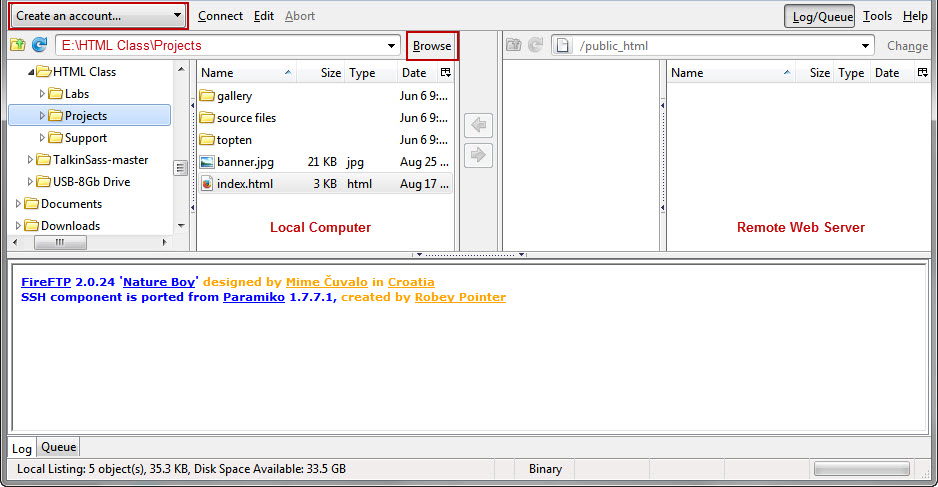
- In the FireFTP tab, click Browse button. Navigate to the appropriate drive (hard drive, portable drive, cloud storage) and select your Projects folder.
- Click Create an account… button. Note: To edit an existing connection, select the connection and click Edit.

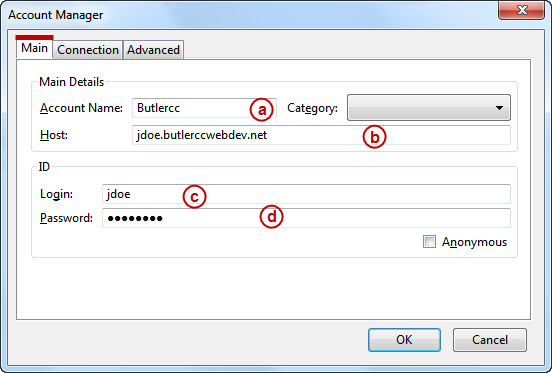
- In the Main tab of the Account Manager dialog box, enter your web account information:

- Account Name: Can be anything - just identifies this connection
- Host: yoursubdomain.butlerccwebdev.net (something like jdoe.butlerccwebdev.net)
- Login: username (account usernames require the first 8 characters be unique, so yours may differ from your subdomain and/or your Butler login.) Note: this is the same one you use to login to your cPanel)
- Password: your password (the one you previously set in your cPanel)
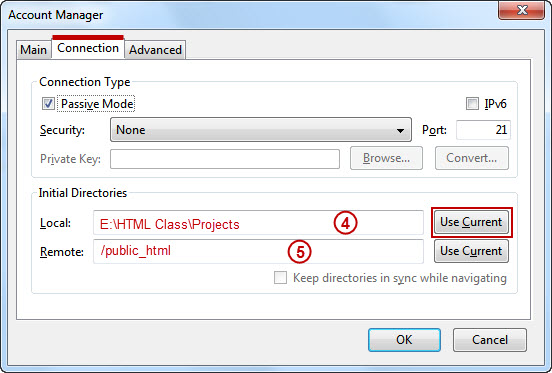
- In the Connection tab, click Use Current button in Local box to save the selected path to your Projects folder.
If you omitted the first step, you may type the path in the Local box.

- Enter /public_html in the Remote box. All files and folders you want visible to users must be uploaded and stored inside the public_html folder.
- When you are finished, click OK.
To upload files to your Web server
The instructions below show the steps required to upload the portfolio page and topten folder to the remote Web server.

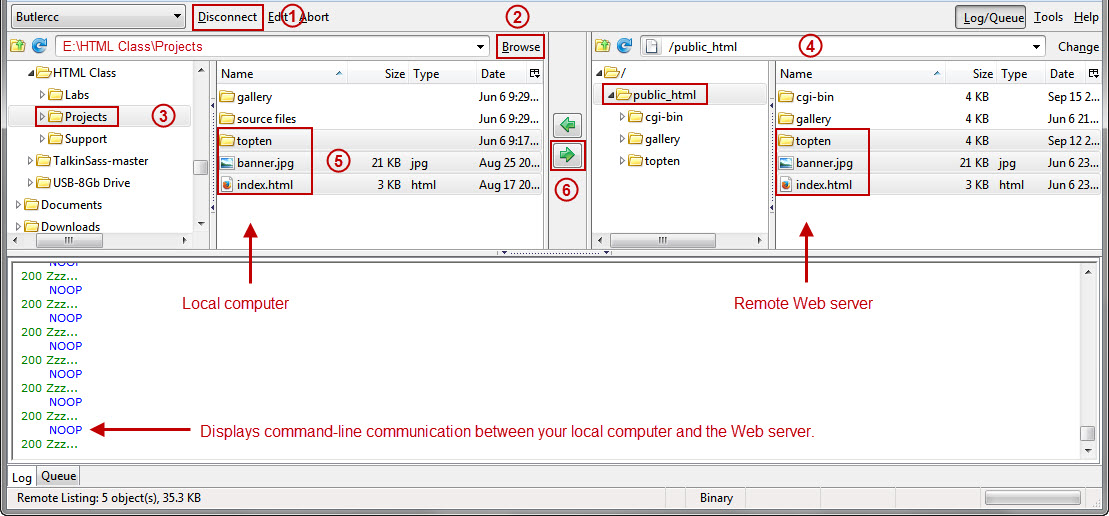
- Click Connect (Disconnect) button to connect to the Web server.
Commands issued by FireFTP are displayed in the bottom pane. If you’ve set up your connection properly, you will see the contents of the public_html folder on the remote Web server displayed in the right pane. - If your Projects folder is not already selected on the left, click Browse button. Navigate to the appropriate drive (hard drive, portable drive, cloud storage) and select your Projects folder.
- In the left pane (local computer) verify the Location bar displays your Projects folder (the root folder for this site).
- In the right pane (remote Web server), verify the Location bar displays the /public_html folder (root folder of your account on the Web server). If necessary, select the public_html folder as shown.
All files must be uploaded to the public_html folder or one of its subfolders. Also, notice the cgi-bin directory in the public_html directory. Do not delete this directory or upload any files to this directory. It contains files you will need later on. - In the local computer pane, select your index.html (portfolio page), image file, and topten folder. Hint! Press CTRL + click each file/folder you want to upload.
- Click the Upload button (right arrow) to transfer the selected files to the root folder on the Web server. When the selected files/folders have been copied to the remote server, you should see them listed in the public_html folder. For relative paths created locally to work on the web server, the directory hierarchy must be identical to your local projects folder.
- Click Disconnect to indicate you are finished.
Open your home page in a browser
- In a browser, enter your subdomain URL in the Address bar (something like
http://jdoe.butlerccwebdev.net/) - The remote Web server should return the index.html file, which should be your portfolio page.
- Bookmark the URL to make it easier to return later.
- Test the link to your topten project index.html page.
- If you find links that don't work, or have images that are not displayed, open the related files in your editor and make any needed corrections.
- Then upload only the updated files to your web server. When prompted, choose to overwrite the existing files on the server. It is not necessary to upload files again that were not modified. You may need to open a lower directory in both panes to upload a single updated file.
That's it--you now have an official web site!