How to Embed Web Fonts
By B Lingafelter CSS, typography
Embedding web fonts with the @font-face rule allows you to link to real fonts on your server, or the server of a font-embedding service rather than resorting to font-replacement technqiues like using images, Flash, and scrpting to create text. This method is not only easier and less work intensive, but also does not negatively impact accessibility or usability.
Acceptable Fonts and Resources
There are two issues you need to consider when choosing web fonts.
- Choose fonts that look good displayed on the web. Many fonts created for print purposes are not legible on the web.
- Choose fonts with licenses that explicitly allow web embedding or redistribution. Be sure to read the end-user license aggreement (EULA); many fonts, including free ones, do not allow web embedding or redistribution.
Use the following resources to find acceptable fonts:
- Font Squirrel @Font-Face Webfont Kits - Webfont Kits include TTF, EOT, WOFF, and SVG formats along with sample .html and .css files. Update: Web Open Font Format (WOFF) is now the standard and works in all modern browsers, making it the only format needed.
- Google Font Directory is a library of free web fonts. Find one you like and link to it using the Google Fonts API .
- The League of Moveable Type is a small collection of free, open-source fonts licensed for font embedding.
- Fonthead - All fonts can be embedded but most are not free.
Example 1: Self-Hosted Web Font
On this page, I used the DroidSansBold font that I downloaded as a kit (droid-sans-fontfacekit.zip) from Font Squirrel. Examples in these instructions refer to this font.
- Go to Font Squirrel and search for an appropriate font. Use the filters (right column) to limit results for a specific use.
NOTE: Due to current licensing issues, not all fonts have a downloadable webfont kit. - Click on the desired font sample to view font specimens, related information, and to access the Webfont kit..
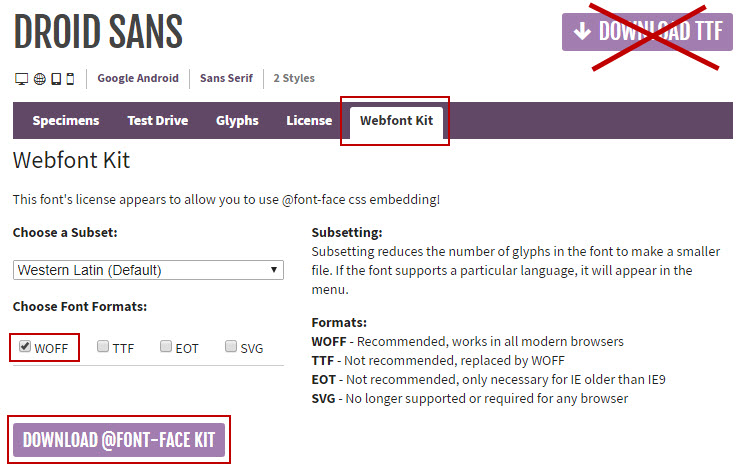
- Click Download @font-face Kit link and save the .zip to a "Web Fonts" folder on your hard drive. (This makes it easy to find and reuse the font on any site.)
- Unzip the kit file. The zip contains a web fonts folder and one or more sub folders bearing the font name of each font style included.
- Open the subfolder that contains the desired font (droidsans_bold_macroman in my case.). You may want to view the .html file in a browser. NOTE: The installation instructions are outdated; only the .woff font file is required for modern browsers.
- Copy and paste the .woff font file (DroidSans-Bold-webfont.woff) into a fonts subfolder in your site project. (For simplicity, I recommend creating the fonts folder inside the css folder.)
- Add the @font-face rule(s) at the very top of your site's external .css file (use code snippet below as a guide).
NOTE: If you choose to copy the @font-face rule(s) from the example stylesheet.css (font folder), be sure to paste it at the very top of your site's external .css file and then remove the unnecessary file format code. - Check that the relative path points to the location of the font file(s) from the .css file in your project, and adjust as needed. NOTE: The relative path must point to location of the font files from the .css file.
- Now just add the font to the beginning of the font stack in the appropriate rule(s). Be sure to wrap font name in single quotes as shown below.
- When you publish the site to your remote server, be sure to upload the fonts folder along with the .css file.
@font-face {
  font-family: 'DroidSansBold';
  src: url('fonts/DroidSans-Bold-webfont.woff') format('woff');
  font-weight: normal;
  font-style: normal;
}article > h3, article > h4 {
font-family: 'DroidSansBold', Helevetica, Arial, sans-serif;
font-weight:normal;
}Example 2: Linking to Google Fonts API
Google fonts can be downloaded and hosted on your server, like the font kits from Font Squirrel. However, you can also choose to just link to a font on Google's fast server and let it serve the correct file type for the browser used. On this page for example, I linked to Google's Tangerine font and then just declared it in my header > h2 selector.
- Go to Google Font Directory and choose an appropriate font.
- Click Quick-use link.
- If available, select additional font styles needed (step 1)
- Scroll down to step 3, Add this code to your website.
- Copy the link tag and paste into the <head> section of your page. Be sure to place it above the link to your site's stylesheet. Refer to Google's Getting Started Guide for examples.
- Now just add the font to the beginning of the font stack in the appropriate rule(s). Be sure to wrap font name in single quotes as shown below.
<link href="https://fonts.googleapis.com/css?family=Tangerine:400,700"
rel="stylesheet">header > h2 {
font-family: 'Tangerine', serif;
font-weight:700;
}